




Free UK Delivery
Online Designer
Price Promise
Credit Accounts

Who We Are?

Despite being a relative newcomer to the industry, Bubble Customised Clothing have established ourselves as one of the leading suppliers of customised clothing and workwear in the UK.

Our History

Established in 2017 by Sam Wareing, we operate out of premises in Warrington, Cheshire, where we run all of our embroidery and print processes. Our success has been built on proving an industry leading service, with turnaround times not exceeding 7 days prior to Covid. As with all businesses we have been effected by the Coronavirus situation, but in 2020 we were proud to import over 1million pieces of PPE to be used by frontline staff in the fight again Covid. In fact you may have seen our feature on ITV news about this. 

We’re working hard to bring our lead times back down and continue to offer an industry leading service. We are fortunate to have an incredibly talented team working for us, all of whom have a wealth of experience in embroidery, print digitising and design.

2022 will see us continue to reduce how our business and how we operate impacts the environment. We have set out our Environmental policy for this year and you can read all about that here.

We have also invested heavily in our website and technology, launching our online ordering portals and continuing to develop the e-commerce functionality of the site so you can customise and order all your workwear and uniform requirements online. We always welcome feedback on the website, good or bad, please do get in touch if there is anything you would like to see improved.

Our Services

Meet the team

Sam 

Monika

Michael 

Stephen

Pauline

Ewa

Karolina

Jeff

Lily

Dora

Please contact the team today to discuss your requirements and we look forward to working with you in the future.

From our customers

Excellent!!!
After being let down by a couple of other companies, I reached out to Bubble and I am so glad I did! Fast delivery excellent communication and the embroidery is fantastic. The quality of the fleece is brilliant. Super thick, soft and very warm!

Kirsten


Custom Hoodie
Brilliant Hoodie. I had a custom one done for my Makers Market Stall and it's fantastic. The print is superb quality and sharp and the hoodie itself is wonderfully warm.

Great fit. Awesome friendly service.

Absolutely recommended for your clothing. 

Paul

Great service!
Recently switched uniform supplier's to Bubble, they have been so helpful and accommodating. Ordering in samples for us to try, nothing was ever a problem. Big thanks to Sam & Steve. Exceptional service.

Claire


Quality counts and great service too
We've been working with Bubble Customised Clothing for several years. Always first class service. The product design is agreed and ordered with ease and delivered by the agreed date. Always happy with the quality of the polos and their embroidery is excellent. Nothing is too much trouble for Sam and Steve.

Alie


Have used Bubble numerous times over…
Have used Bubble numerous times over the last few years for school uniform for both my children. Really impressed with the quality. Very easy to order. Always received excellent customer service.

Jane


Great Service & Quality
Quality of school uniform polo shirts and jumpers were great. The logos were stitched so that they were straight & delivery from point of order was rather quick. Thank you

Mitchell


COMPANIES WE HAVE WORKED WITH

disney
John Lewis
Warrington Wolves
warrington Borough Council
O2
Jiffy Packaging
Vanarama
Your cart is empty

Select Currency

{CC} - {CN}
 

Select Size


Extra Product Options


    Please enter your Layout name


    Select Type Of TextSelect Type Of Initials/namesSelect Type Of LogoSelect placeholder type


    Please enter your text


    Select a design

    Please wait while the image gallery loads


    Confirm Request Quote

    You will be redirected to a page where you can request a quote for this blank product. Any decorations you have added to this product will be removed.


    Select product

    Select product

      Products


      How many colours are in this design?

      You now have multiple elements making up this screenprint design

      Select the colours that appear in your design.

      You need to specify the total number of unique colours used across all the elements in your design.

      This helps us determine the pricing based on the number of colours in your design.

      • (plus white base)

      You can also specify the colours used in your design eg "Red", "Blue", "pantone 1809".

      If you dont tell us, our professional designer will work it out for you.

      • (plus white base)

      Currently selected Colours


      How many colours are in this design?

      • coloured image
      • original image

      How many colours in your design?

      4 Colours

      Select the colours to be used

        COLOR PICKERS GO HERE
       

      Your Cart

      Products Qty Price
      Total £0.00
       

      Re-use existing screen print designs

      You have already used screen printing in this order. To avoid additional screen costs you can re-use an existing screen print design for this product.

      You can

      Re-use existing designs

      or


      WarningError

      Your layout contains images that have been resized to the point where they may appear blurred.

      Below-quality images listed

      Your layout contains images that appear outside the design area.

      You cannot save the product until you have moved the images within the design area.

      Your layout contains images that appear outside the design area.

      Your layout contains overlapping images.

      You cannot save the product until you have moved the images so they are not overlapping.

      Blank product purchase is not allowed

      You will not be able to purchase this product until you add a decoration design.

      Inactive blank product in use

      Product minimum quantity requirements not met

      You will need to increase the specified quantity to add this item to your cart.

      Process minimum quantity requirements not met

      Screen(s) still updating...

      You will not be able to purchase this item until all re-used screens have been updated.

      Your layout contains images that have been resized to meet the 25 megapixel limit for raster images and they may appear smaller than intended. You can avoid the raster size limit by uploading artwork in vector format when possible.

      By clicking OK, you are agreeing to accept the final product regardless of image quality. Click Cancel if you want to go back and fix the images.


      Add Initials/names


      Edit Initials/names.

      Add Another Initials/names
       

      Uploading file


      Get Started 

      You can decorate this product using the buttons below. If you want to change the product, select the "products" tab then choose the product you want to decorate
      • Add Logo

        Add a logo to the selected product
      • Add Text

        Add text to the selected product
      • Add Initials/names

        Add initials/names to the selected product


      Online Designer Help 

      The Designer is an easy to use tool that allows you to design your own product. You can select a product to decorate with stock art, your own designs or photos and text.

      To change the currently selected product:

      1. Click on the Change Product button in the Product panel.
        Product Button

        The Select Product popup will be displayed.
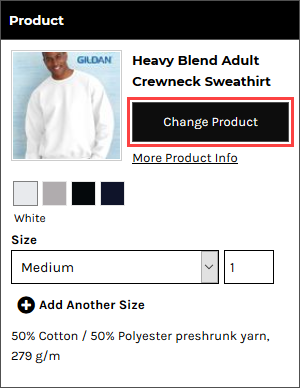
        Product Details Panel.png
      2. Click on a product to select it.

      To add text to a product:

      1. Click on the Add Text button in the Designer Toolbar.
        Add Text Button
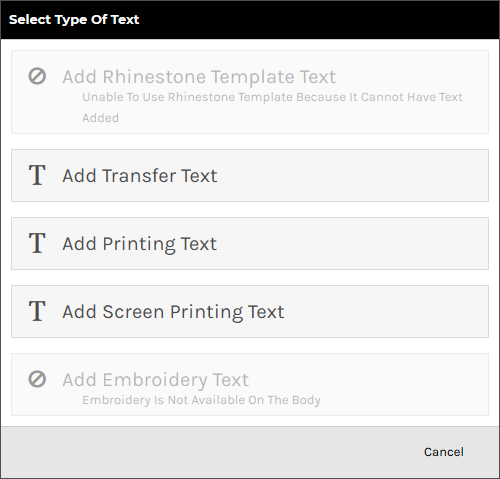
      2. Select the type of process to be used for the text in the Select Type of Text popup. Only options that are supported by the product being decorated will appear.
        Select Type Of Text Popup
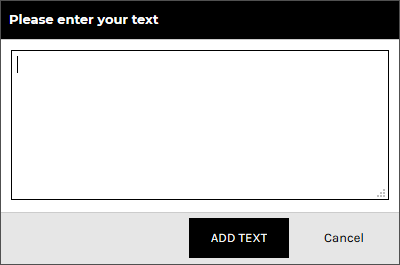
      3. Enter the text, and click ADD TEXT.
        Please Enter Your Text Popup

        The text will appear inside the decoration area in its bounding box with editable size dimension, resize and rotate handles and delete control available.
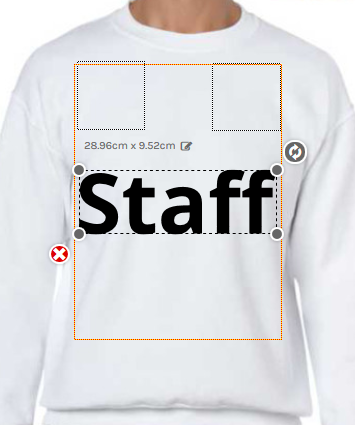

        Inserted Text

      To adjust text properties:

      1. Click on the View and organize layers button in the View Toolbar.
        View And Organize Layers Button
      2. Click the text object you wish to adjust the properties of.

        The Text Properties panel will appear on the left side of the Designer.
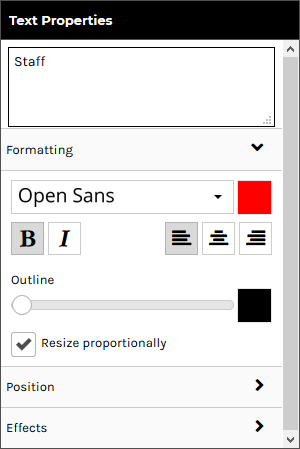
        Text Properties Panel
      3. Configure the text as required:
        • Text Box: lets you edit the text.

        Formatting

        The Formatting tab is expanded by default and contains the following controls:

        • Font: change the font via the Select A Font popup.
        • Font color: change the text color via the color popup.
        • Bold: boldens the text.
        • Italics: italicizes the text.
        • Left-align: aligns text to the left when it spans multiple lines.
        • Center-align: center-aligns text when it spans multiple lines.
        • Right-align: aligns text to the right when it spans multiple lines
        • Outline: lets you apply an outline to the text. At the leftmost position on the slider, no outline is applied. Moving the slider to the right applies an outline that increases in thickness the further right it is moved.
        • Outline Color: lets you set the color of the outline via the color popup.
        • Resize Proportionally: when this checkbox is ticked, the text will keep its original proportions when you resize it.

        Position

        Effects are only available for the direct to garment printing decoration process.

        Click on the Position tab to expand it. Expanding the Position tab reveals the following controls:
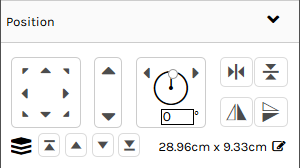
        Position Controls
        • Position controls: lets you move the selected text within the decoration area using any of the eight directional arrows.
        • Size controls: lets you increase/decrease the size of the selected text by clicking on the up/down arrows.
        • Rotation controls: lets you turn the selected text around its center axis. You can do this by:
          • Specifying a specific angle at which to rotate the text.
          • Clicking on the left arrow to rotate the text 5 degrees to the left.
          • Clicking on the right arrow to rotate the text 5 degrees to the right.
        • Horizontal Centering controls: Horizontally centers the selected text within the decoration area.
        • Vertical Centering controls: Vertically centers the selected text within the decoration area.
        • Layering controls: lets you change the layer at which the selected text is positioned in relation to other decorations.

        Effects

        Click on the Effects tab to expand it. Expanding the Effects tab reveals the following text effects:
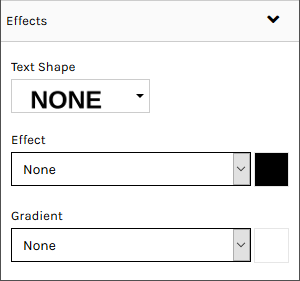

        Effects Controls
        • Text Shape: lets you alter the shape of the text. The options indicate the shape that they will apply.
        • Effect: lets you add a shadow or glow effect to the text.
          • None: no effect is applied.
          • Shadow: applies a drop shadow to the text.
            • Offset: lets you set the position that the shadow will be offset from the text.
            • Blur: lets you set the level of blurring effect that will be applied to the shadow.
          • Glow: applies the appearance of a glow around the text.
            • Strength: lets you set the intensity of the glow.
            • Blur: lets you set the level of blurring effect that will be applied to the glow.
        • Effect Color: lets you set the color of the Effect via the color popup.
        • Gradient: sets a horizontal or vertical gradient of color between the selected font color and the gradient color.
        • Gradient Color: lets you set the color of the Gradient via the color popup.

      To add a design using the Add Design button:

      1. Click on the Add Design button in the Designer Toolbar.
        Add Design Button
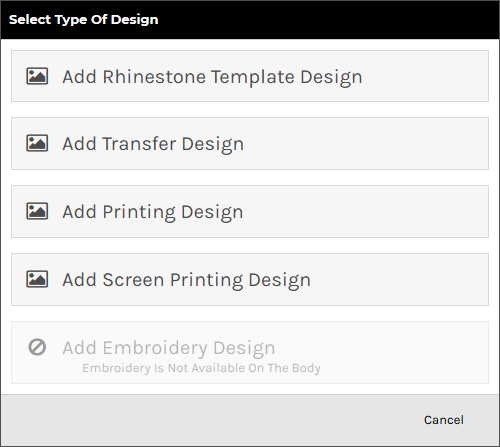
      2. Select the type of process to be used for the design in the Select Type of Design popup. Only options that are supported by the product being decorated will be enabled.
        Select Type Of Design Popup
      3. Browse to and click on the design you want to add in the Select a design popup.
        Select A Design Popup

        You can select designs from the following sources:

        • Upload a new design: Click on Upload Image to upload a design from your device.

          Raster, vector, and embroidery file types are supported in the formats as listed below:

          • Raster (PNG, JPG, JPEG, GIF, TIF)
          • Vector (CDR*, PDF, EPS, PS, SVG, SVGZ)
          • Embroidery (EMB)

          Vector based graphics will have modifiable elements such as text and colors editable on the fly by users.

          *CDR requires the CorelDRAW app to be enabled. When a CDR file is uploaded it will be automatically converted to SVG format so that it can be modified in the Online Designer.

        • Your own previously uploaded design designs: These will appear under the Upload Image button if you have uploaded designs before.
        • Instagram: Click on the Instagram button and enter your credentials to access your Instagram pictures.
        • Facebook: Click on the Facebook button and enter your credentials to access your Facebook pictures.
        • Store Designs: designs exclusive to the store.
        • Stock Designs: Third-party designs available for use in DecoNetwork.
      4. Click SELECT DESIGN.

        The design will appear inside the decoration area in its bounding box with editable size dimension, resize and rotate handles and delete control available.
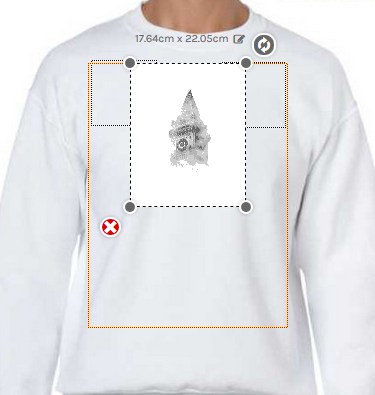
        Inserted Design

      To add a design by drag and drop:

      1. Drag a design file from your computer into the decoration area of the product in the Designer.

        The decoration area will be highlighted when the mouse pointer is within its boundaries.
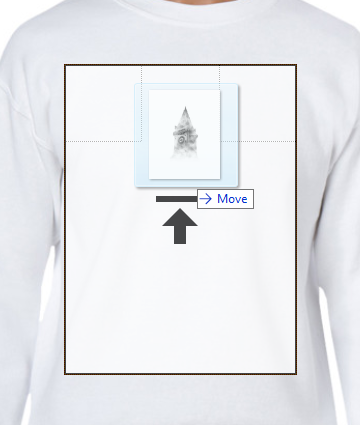
        Highlighted Decoration Area
      2. Release the mouse button to drop the design into the decoration area.

        The Select Type of Design popup will be displayed with the supported decoration types enabled for the product selected.

        Select Type Of Design Popup
      3. Select the decoration process you want to be used for the design.

        The system will begin uploading the design file to your own design library.

        Uploading Design.png
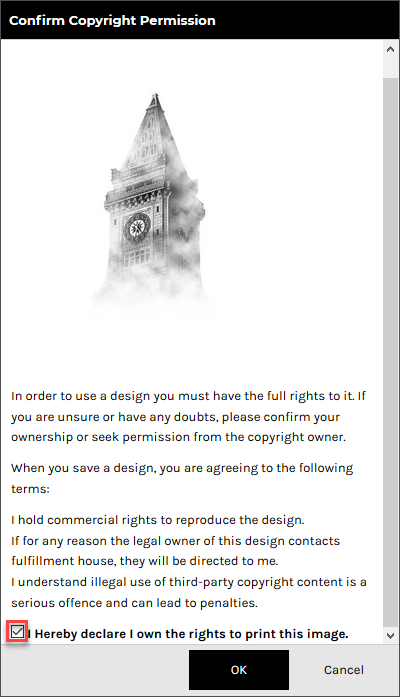
      4. Tick the, I hereby declare I own the rights to print this image, checkbox in the Confirm Copyright Permission popup to verify that you have permission to use the design.
        Confirm Copyright Permission Popup
      5. Click OK.

        The design will appear inside the decoration area in its bounding box with editable size dimension, resize and rotate handles and delete control available.

        Inserted Design

      To adjust design properties:

      1. Click on the View and organize layers button in the View Toolbar.
        View And Organize Layers Button
      2. Click the design object you wish to adjust the properties of.

        The Image Properties panel will appear on the left side of the Designer.
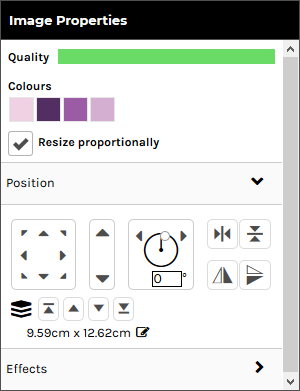
        Image Properties Panel
      3. Configure the design as required:
        • Quality: Shows you a bar indicating how clear the image is for printing. The indicator reflects how well the raster-based graphic is going to print before blurring too badly. If this drops below a certain threshold, the system will warn the customer that their print quality will be compromised.

          This option is only available for raster designs.

        • Colors: Shows you the colors currently used in the design.
          • edit: Click on the link to edit the design colors.

          This option is not available for designs that have restrictions on customizing.

        • Resize Proportionally: when this checkbox is ticked, the design will keep its original proportions when you resize it.

          This option is not available for embroidery, transfer and rhinestone designs.

        • Ungroup: click on the link to ungroup the design into its component elements.

          This option is only available vector-based designs.

        Position

        Click on the Position tab to expand it. Expanding the Position tab reveals the following controls:

        • Position controls: lets you move the selected text within the decoration area using any of the eight directional arrows.
        • Size controls: lets you increase/decrease the size of the selected text by clicking on the up/down arrows.
        • Rotation controls: lets you turn the selected text around its center axis. You can do this by:
          • Specifying a specific angle at which to rotate the text.
          • Clicking on the left arrow to rotate the text 5 degrees to the left.
          • Clicking on the right arrow to rotate the text 5 degrees to the right.
        • Horizontal Centering controls: Horizontally centers the selected text within the decoration area.
        • Vertical Centering controls: Vertically centers the selected text within the decoration area.
        • Layering controls: lets you change the layer at which the selected text is positioned in relation to other decorations.

        Effects

        Click on the Effects tab to expand it. Expanding the Effects tab reveals the following controls:
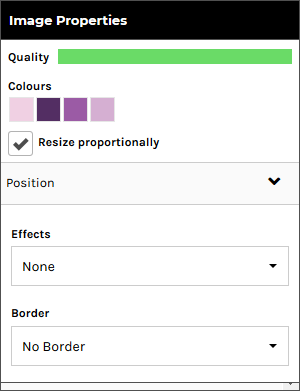
        Image Properties Panel - Effects Section

        These options are only available for raster designs.
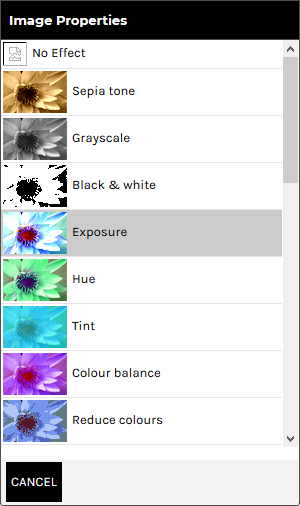
        • Effects: lets you apply a special effect to the design that alters its appearance. Click on the Effects drop-down box to see the effects options.
          Effects Options

          Click CANCEL to return to the Effects Panel.
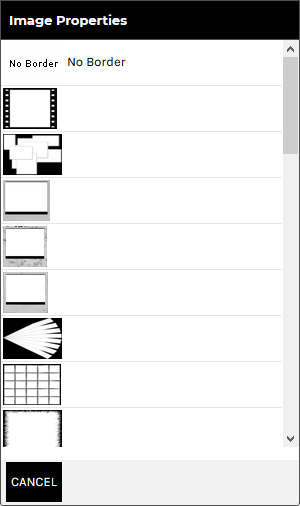
        • Border: lets you apply a border to the boundary of the design. Click on the Borders drop-down box to see the border options.
          Border Options

          Click CANCEL to return to the Borders Panel.


      To specify product sizes and quantities:

      1. Click on the Product button in the Designer Toolbar.
        Product Button

        The Product panel is displayed.

        Product Panel
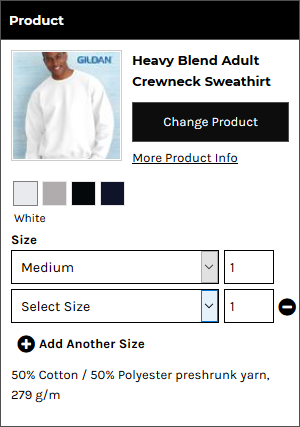
      2. Select a size from the Size drop-down list and specify the quantity required in the input box for that size.
      3. Click Add Another Size to specify quantities for each size required.
        Another Size Fields

      To specify product size and quantity when products are sold in bulk:

      1. Click on the Product button in the Designer Toolbar.
        Product Button - Bulk Quantity

        The Product panel is displayed.

        Product Details Panel - Bulk Quantity

        The Quantity field will show the minimum quantity you can purchase.

        Note, you can not select multiple sizes when products are sold in bulk.

      2. Select a size from the Size drop-down list in the Product Panel.
        Product Details Panel - Size Dropdown
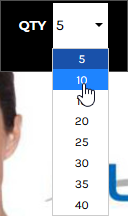
      3. Select a quantity from the QTY drop-down list in the Designer Toolbar.
        QTY Dropdown

      To arrange design layers:

      1. Click on the View and organize layers button in the View Toolbar.
        View And Organize Layers Button

        The Layers panel is displayed showing all the text and design objects present in the decoration area.
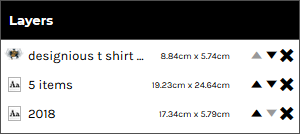
        Layers Panel
      2. Arrange the elements as required:
        • To move a layer up, click on the up arrow to move it to a new position in the list. Likewise, to move a layer down, click on the down to move it to a new position in the list.
        • To delete a layer, click the cross icon at the right of the layer.

      To re-group template design elements:

      You can group elements from a template design that you have ungrouped.

      1. Click on the View and organize layers button in the View Toolbar.
        View And Organize Layers Button

        The Layers panel is displayed showing all the text and design objects present in the decoration area.

        Layers Panel - Ungrouped Elements
      2. Hold down the Ctrl key and click on each layer you want to be grouped.
      3. Click on the Group Selected Items button in the View Toolbar.

      To add team names:

      "Team name" allows automatic formatting of text in the form of a small name and large number beneath, decorated onto the product. This is useful for teams and other groups who would like a jersey-style name and number on their product.

      1. Click on the Add Team name button in the Designer Toolbar.
        Add Team Name Button
      2. Select the decoration process you want to be used for the team names.

        The Add Team name popup will be displayed.

        Add Team Name Popup
      3. Select a size and specify the quantity required for that size.
      4. Click Add Another Size to specify quantities for each size required.
      5. Click Next.

        The Edit Team name popup will be displayed containing Name and Number fields to match the quantities specified in the Add Team name popup.
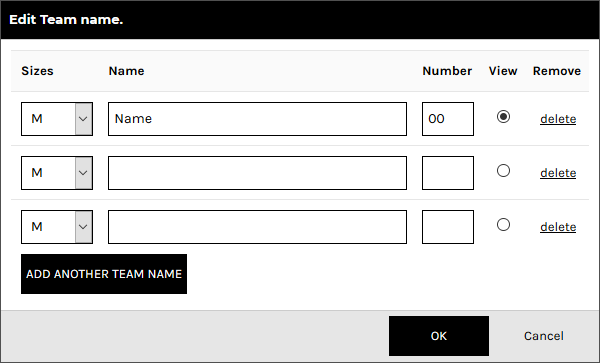
        Edit Team Name Popup
      6. Configure team names by entering the team name and number for each product to be decorated.

        The item selected in the View column will be the item that is displayed in the Designer.

      7. Click Add Another Team Member and specify the team name and number for each additional product required.
      8. Click OK when done.

        The team name and number will be set up on the product as text areas whose properties may be adjusted as per normal text, except that any changes made will apply to all team name products.
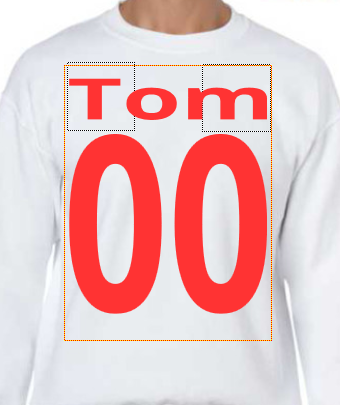
        Team Name On Product

        See the section, To adjust the properties of text in the Designer, above, for details on how to adjust the formatting, adjust the position and apply effects to the text fields.


      9. If you want to edit the teamnames and numbers, select a text area and click Edit teamnames in the Text Properties panel to display the Edit Team name popup.